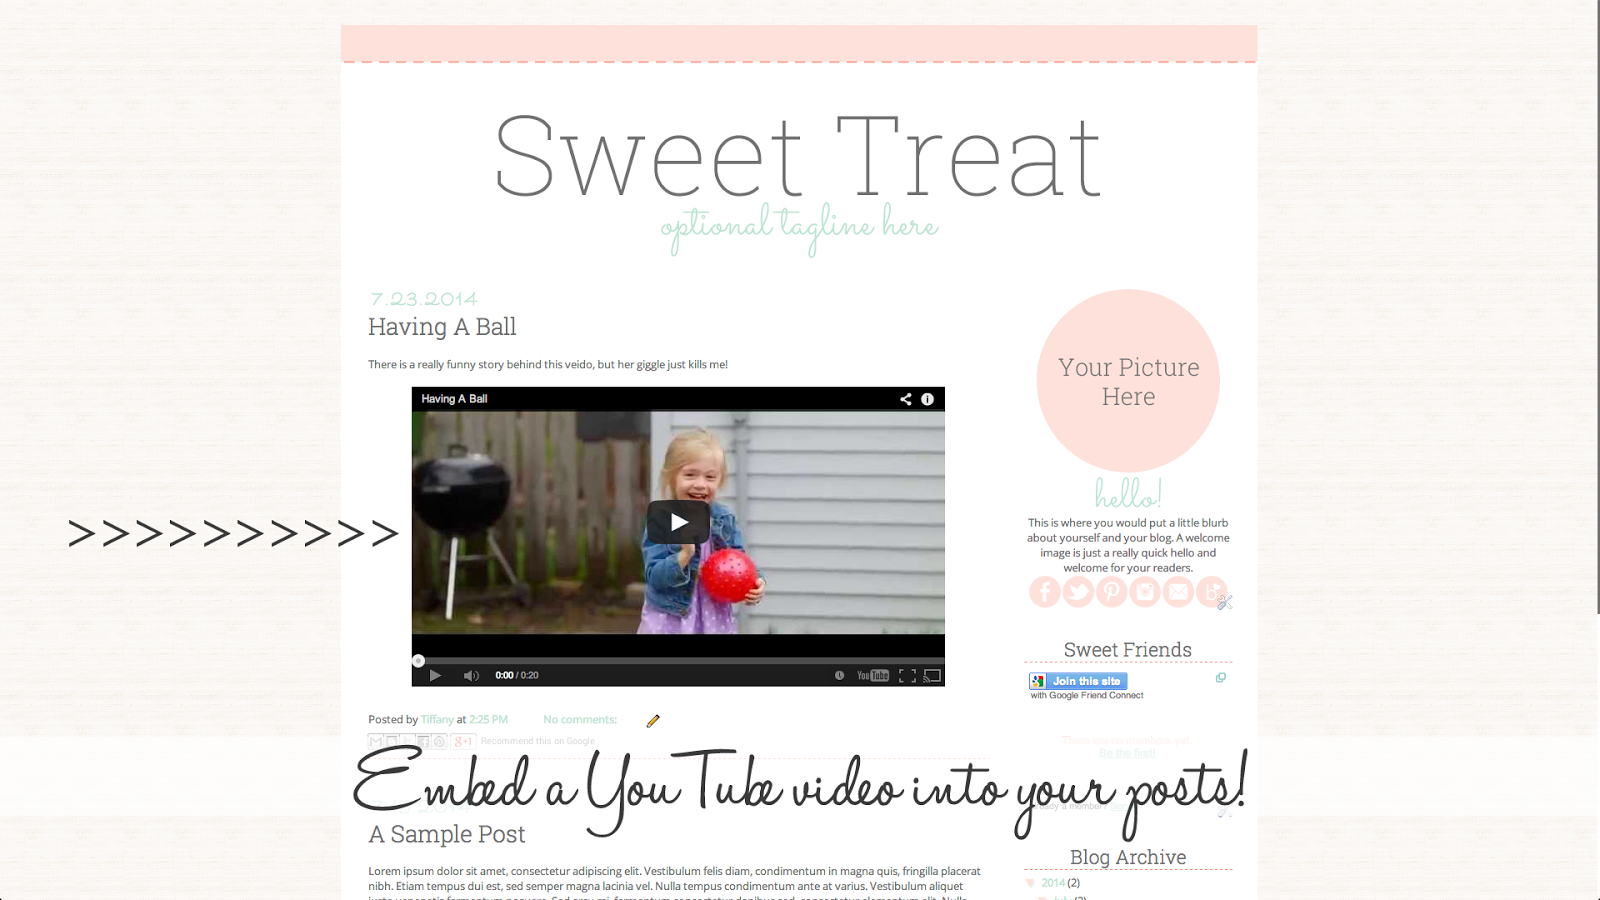
7.23.2014

Embed A Youtube Video Into Your Blog

I don't know about you, but I LOVE being able to share some of my videos on my personal blog. There is a way to add videos through blogger. But let's be honest, they just don't look nearly as nice as they could. So today I thought I would post a simple tutorial on how to post a video to your blog via YouTube.


It really is a rather easy thing to do once you have an idea of what your doing.

1. First and foremost you want to record your video. It doesn't matter if you do it on your phone or your camera. Just record it and upload it to your youtube account. Easy so far right? If you don't have an account it is super easy and free to set up!!!

2. Once you have your video uploaded and saved you will see three little tabe below it. Share, Embed, and Email. You are going to want to click the embed option and it should look like this!
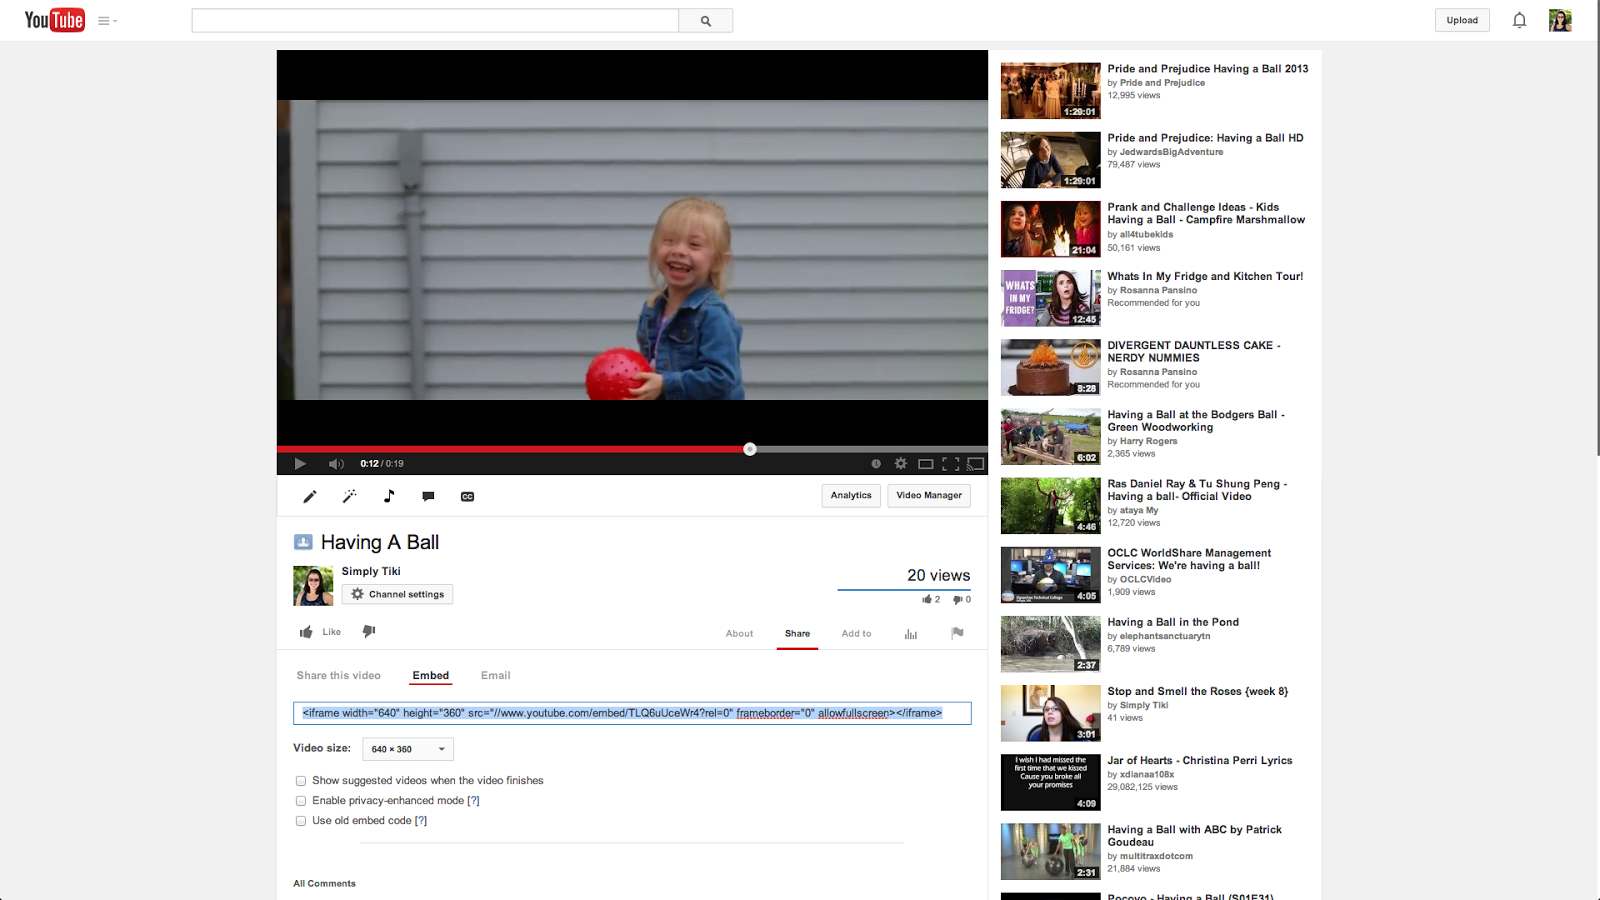
There are a couple changes you can always make. I always click the 640 by 360 option for the size and remove the suggested videos option. Once you have made your edits, you are going to highlight the code in the box and copy it. It should look something like this:
<iframe width="640" height="360" src="//www.youtube.com/embed/TLQ6uUceWr4?rel=0" frameborder="0" allowfullscreen></iframe>

3. Now you are going to go into blogger! Open your post and click the HTML tab in the upper left corner of your posting space. Once you have done that you will paste in the code below whatever you have typed. 
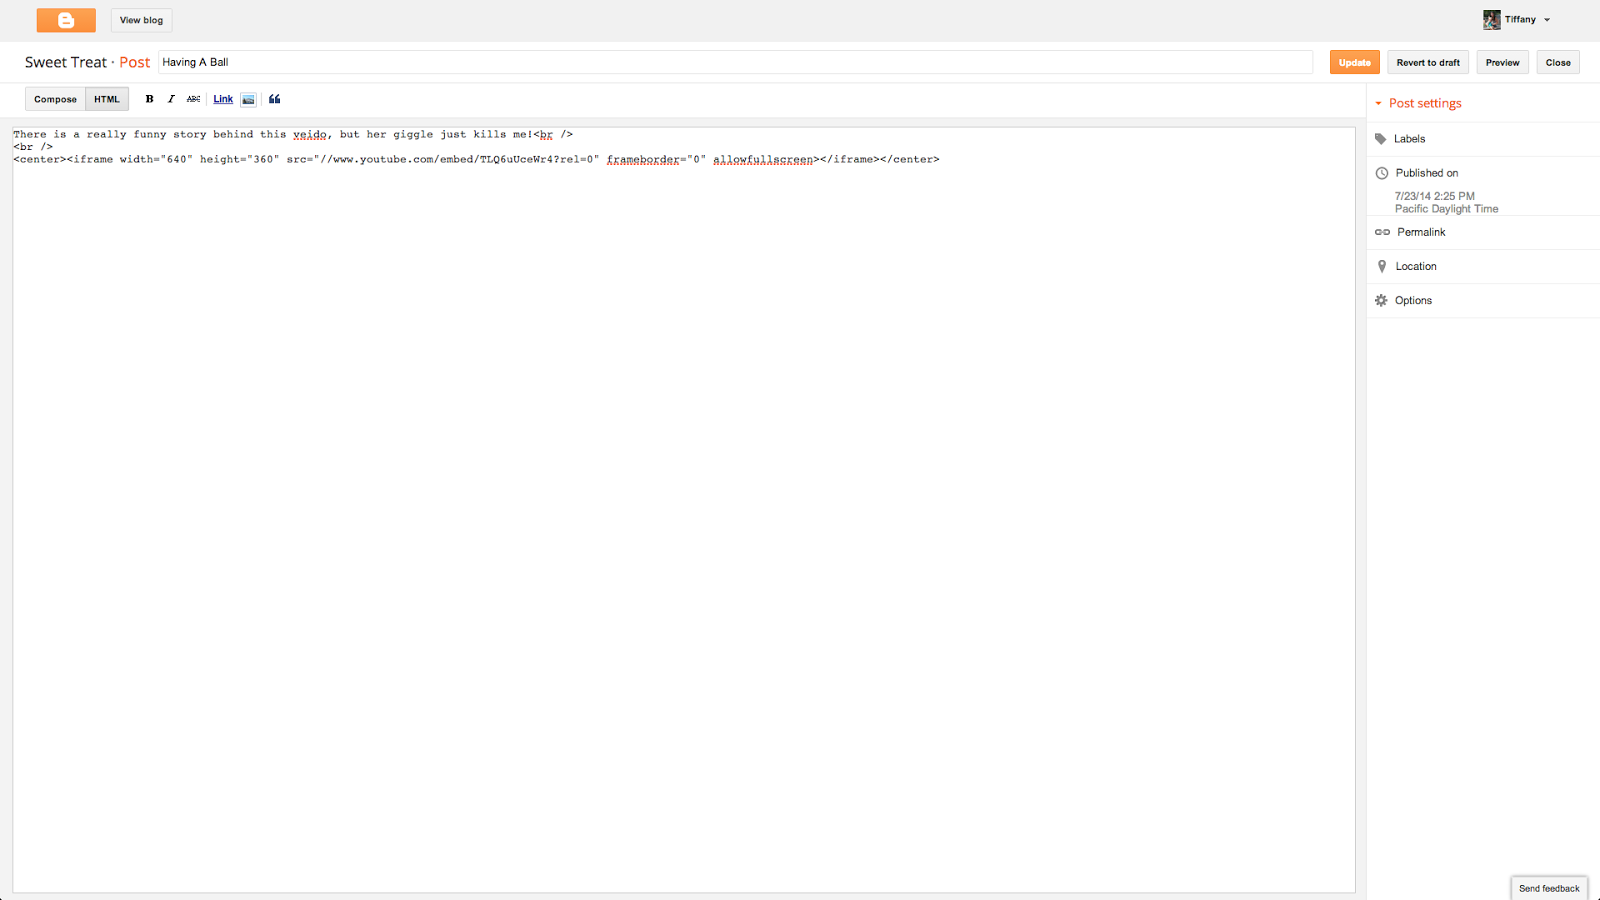
I also center the code by putting <center> before it and </center> directly after it. So then it looks like this. <center><iframe width="640" height="360" src="//www.youtube.com/embed/TLQ6uUceWr4?rel=0" frameborder="0" allowfullscreen></iframe></center>

4. Now you will go back to compose mode and finish up your post. Once you are all done make sure you hit the preview option and it should look something like this!
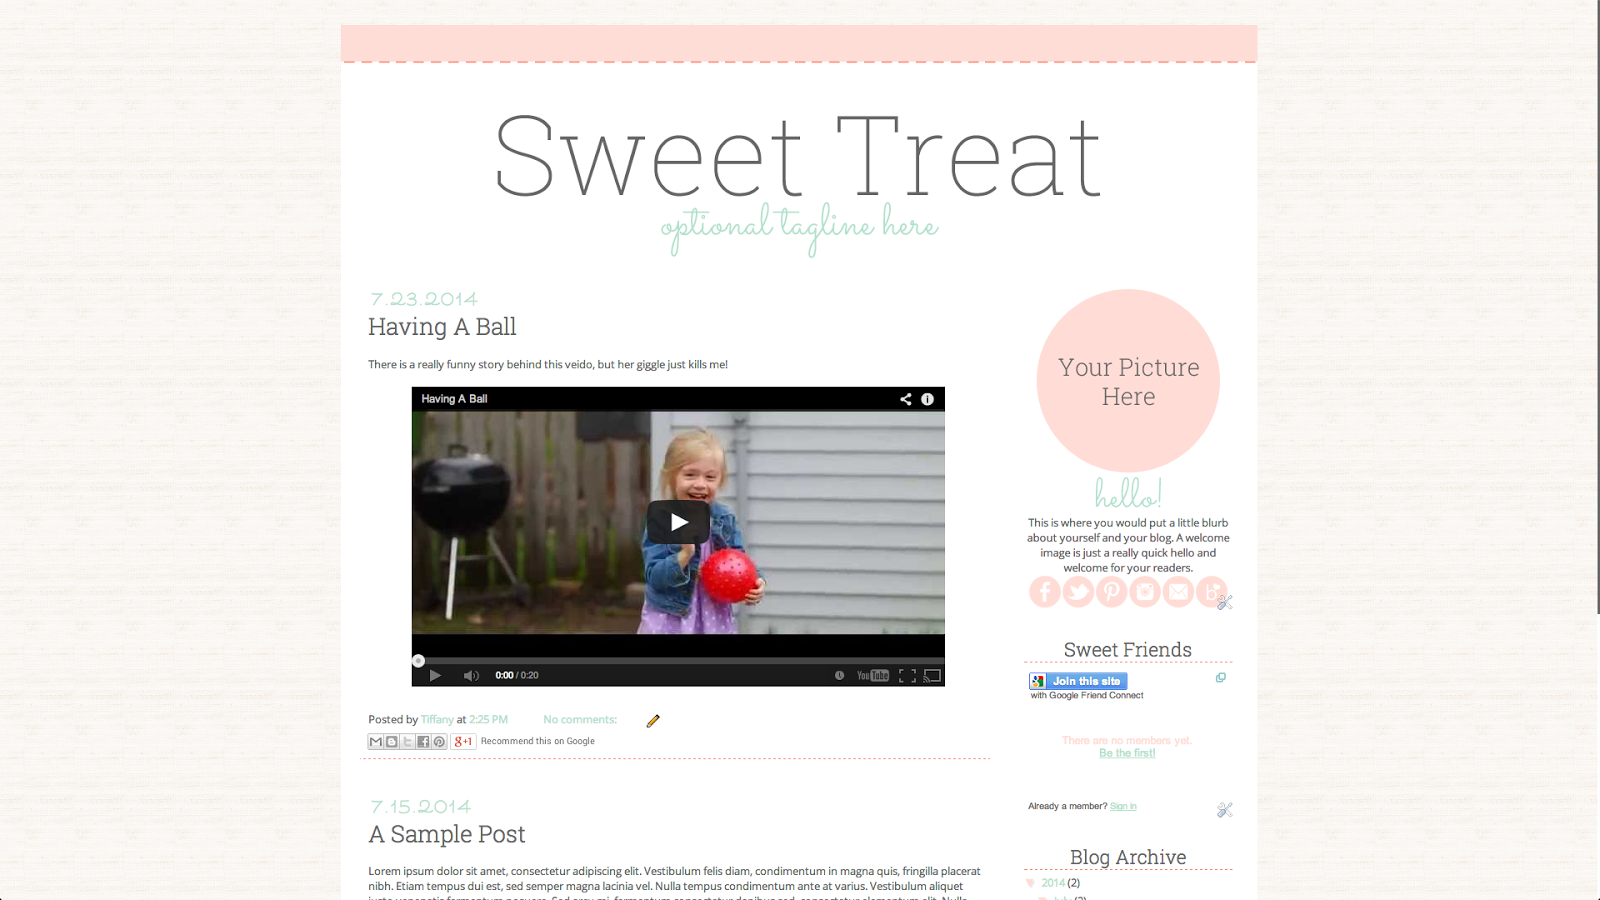
See, I told you this was easy! There is no reason that words and pictures should be the only way you share things on your blog posts!

7.16.2014

Add Instagram Widget To Your Sidebar

As Instagram has gotten more and more popular, people have started really wanting to add an Instagram widget to their sidebar.


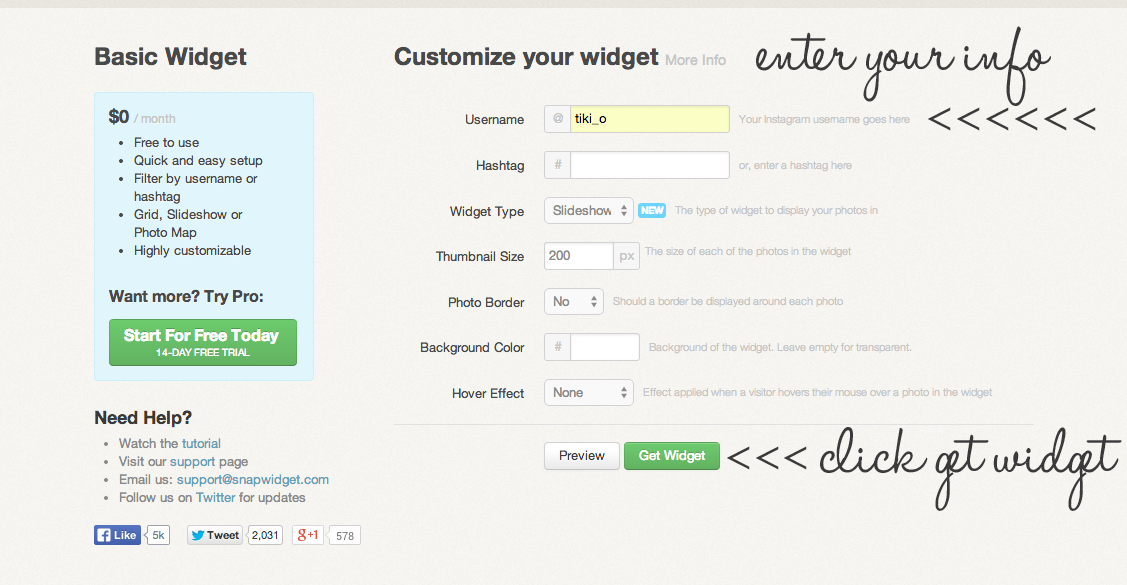
There is this really great website called SNAPWIDGET and they have the option to make a free widget. You wouldn't believe just how easy it is to do. 


It's really that simple.

1. Enter your username
2. If you want just a certain hashtag to show then just type that in. 
3. Choose your widget type. I like to do the slideshow widget. 
4. Choose your widget size. Its a good idea to know what your sidebar width is for this part. 200px is usually a good number though. 
5. You edit your photo border, background color, and hover effect. But I typically leave these three items alone. 
6. Preview your your widget and make sure it's to your liking.
7. Grab your code. It should look like this:
<!-- SnapWidget -->
<iframe src="http://snapwidget.com/sl/?u=dGlraV9vfGlufDIwMHwzfDN8fG5vfDV8bm9uZXxvblN0YXJ0fHllcw==&v=16714" title="Instagram Widget" allowTransparency="true" frameborder="0" scrolling="no" style="border:none; overflow:hidden; width:205px; height:205px"></iframe>
8. Go to your Blogger layout page and click add a gadget. Scroll down until you see HTML/JAVASCRIPT and click the little plus sign.
9. Now you just paste in that code. If you want it to be centered then you just <center>YOUR CODE HERE</center>.
10. Move the widget wherever you would like it placed and then hit save!

Now you can share your Instagram images with your readers as well! 

5.18.2013

Making Your Blog An App | A New Service!!!

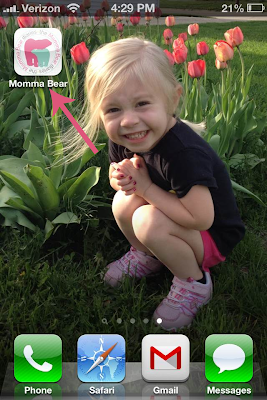
Today I was asked to help a dear friend of mine make her blog into an app. To do this you need to create an icon for your blog so that people can add it directly to their iPhone/iPad/iPod homescreen.
Isn't that so freaking cool?!?! And you wouldn't believe how easy it is to set these up!

1.Make an Icon: It needs to be 129 by 129 pixels. I will happily make this image for you for $5.00.  Just EMAIL me to let me know!

Save your icon as a .png and upload it to photobucket {or however you host your images} to get the image URL. Copy & Paste the URL into this code

<link rel="apple-touch-icon" href="YOUR-IMAGE-URL-HERE"/>

2. Install Code: {Blogger} Go your dashboard in the template section and click “edit HTML”. Use Control + F or Command + F to find </head> in your HTML. Paste your icon code above </head> and hit save
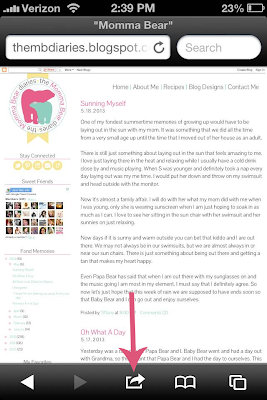
3. Open Safari on your Apple device and go to your blog URL in FULL SITE mode NOT the mobile mode, click on the icon shown below.
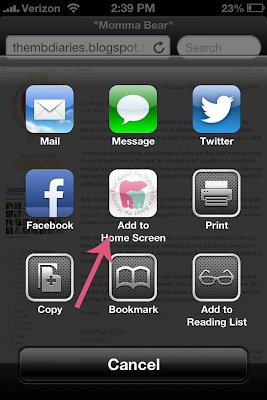
4. Hit Add to Home Screen. 
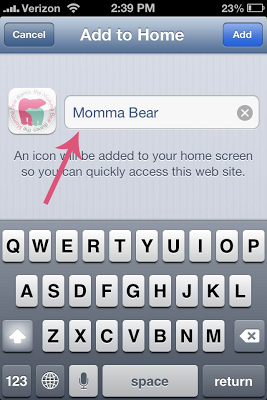
5. Give Your Icon A Name. Keep in mind that if it is a long name it won't all show in one line. 
Now you have the perfect icon that represents your blog on your phone! You can also do this for your favorites to make a sort of reading list. 

I would love to do this for your blog! I will make and install the image for you for $10! Please email me and we will get started!!!

1.31.2012

Disable Word Verification

Recently a dear friend of mine wanted to know how to disable word verification. I have heard alot of people saying that they hate word verification and alot of times they refuse to comment on a blog that has one. If you would like to disable it there is an easy but silly way to do so!


First of all you have to switch back to the old blogger interface. To do so you will click on the little gear in the upper right hand side of your dashboard. Then you will click the old blogger interface option. 


Now you just click settings, comments, and then scroll down to the bottom of the page. Click the no option for word verification ( I also recommend you always moderate comments) and then you save options. 


Now you just go to the top of the page and click try updated interface and you are back to normal! See it's kind of a silly process, but for some reason the new interface just doesn't give you the option.
I hope this worked for you guys! If you need any help comment or email me and I will do my best to help you figure it out!

Right Click Disable

As a blogger and blog designer the content on my blogs is very important to me. When I designed Tammy's blog I decided that maybe it was time to learn how to make sure that nobody can steal the photos or design content of a blog. To do this you have to right click disable the blog. The thing about doing this is that it doesn't only right click disable the pictures. It disables all of the content on the blog. The only thing that you may not like is that this means that someone won't be able to right click, and open links in a new window. Everything on your blog still works perfectly though. If you are interested in doing this then follow these directions!


First you will go to the layout page of your blog by going to the little tab beside new post and going down to the layout option!


Now you will go in and click to add a gadget. Then scroll down until you see the HTML/Javascript gadget and click the plus sign to add that!


Now you will do some simply copy and pasting into that box! You leave the title for the gadget blank and paste the following code into the box:


<script language=javascript>
<!--

//Disable right mouse click Script
//By Being Geeks
//For full source code, visit http://www.beinggeeks.com

var message="OOPS! Sorry,right click isn't allowed!";

///////////////////////////////////
function clickIE4(){
if (event.button==2){
alert(message);
return false;
}
}

function clickNS4(e){
if (document.layers||document.getElementById&&!document.all){
if (e.which==2||e.which==3){
alert(message);
return false;
}
}
}

if (document.layers){
document.captureEvents(Event.MOUSEDOWN);
document.onmousedown=clickNS4;
}
else if (document.all&&!document.getElementById){
document.onmousedown=clickIE4;
}

document.oncontextmenu=new Function("alert(message);return false")

// -->
</script>


Do you see where it says "OOPS! Sorry, right click isn't allowed!"? You can put whatever you want it to say when someone tries to right click your blog into that spot. But make you that you leave the quotations or it wont work!
I hope this works for you! If there are any issues at all just comment or email me and I will help you in any way that I can!

12.16.2011

Edit Pages


Most of the time when I create a blog design for you I will set up pages and you will have to go in and add your content. Here is how you get to the point of adding in your content.
First you will log into your blogger account using your email address and password.                                     
pages


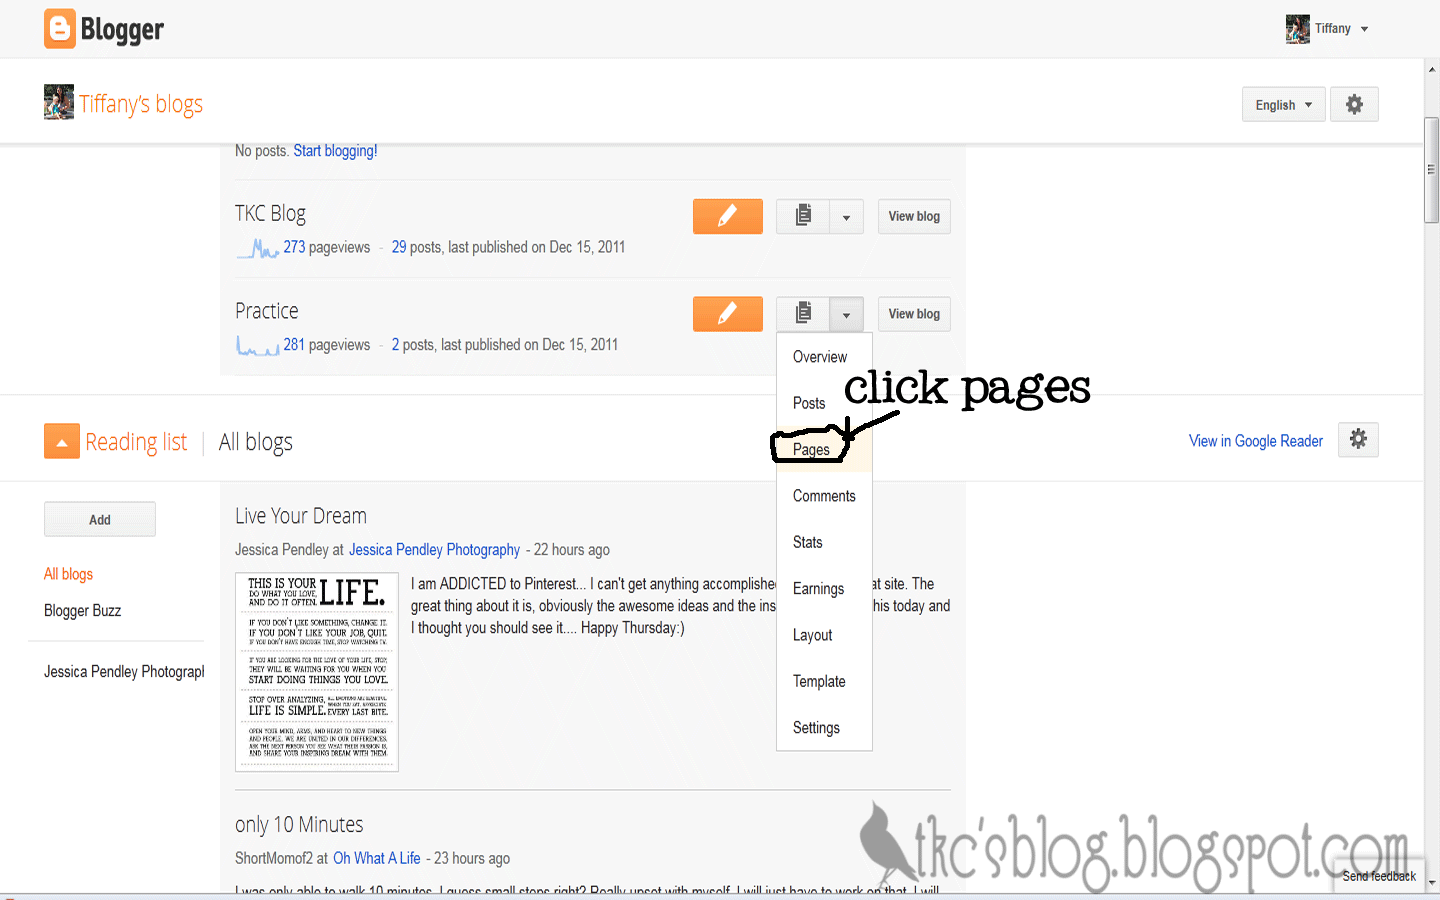
Now you will click on the icon that looks like two pieces of paper. Then you will scroll down to Pages and click on it.


edit pages


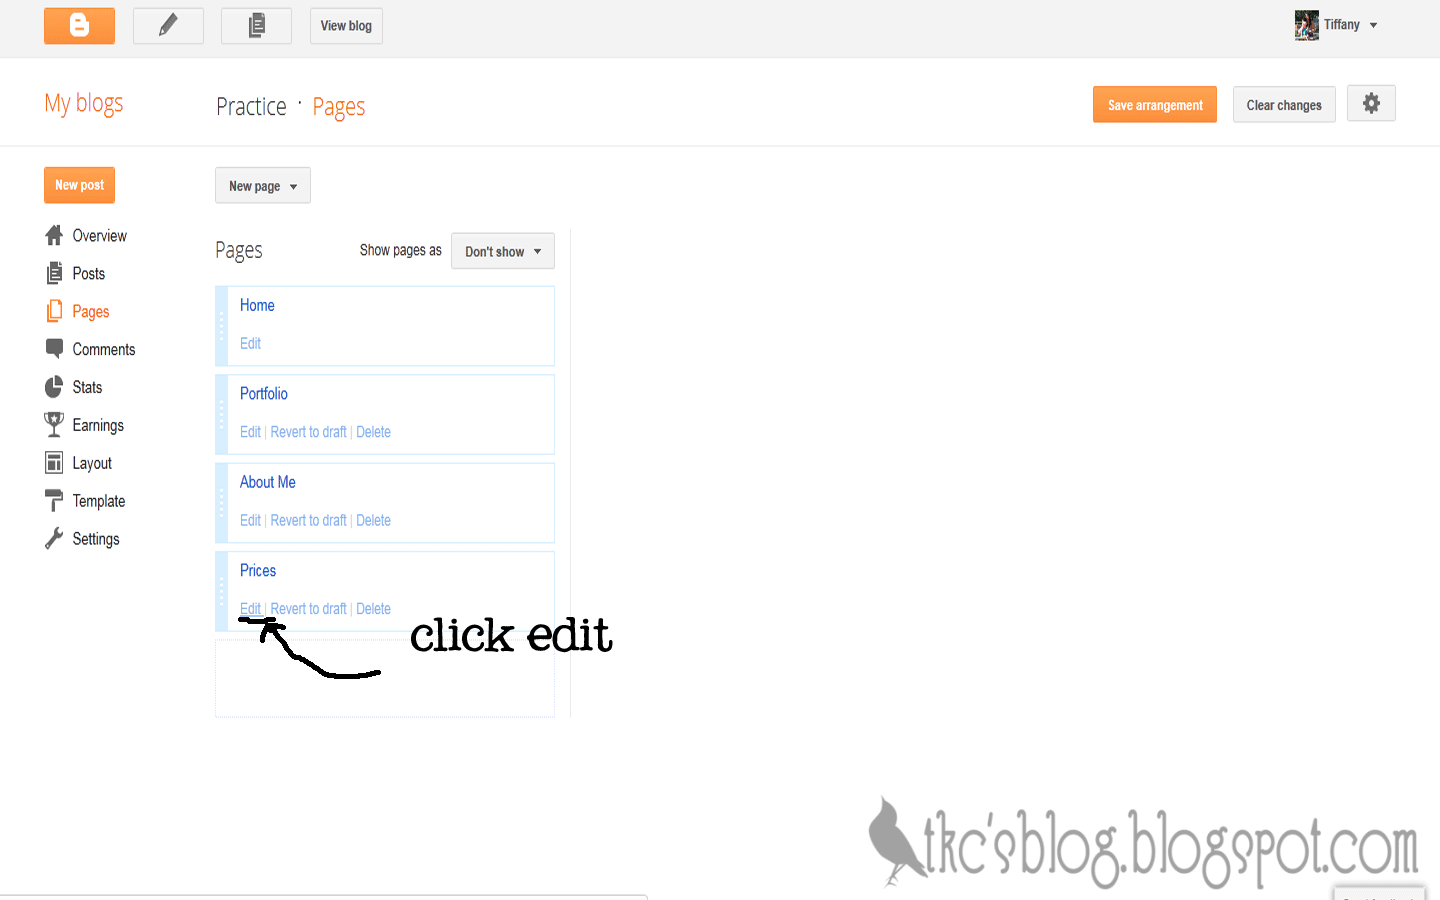
You will go to the page that you want to change and click edit. Then just add  your content in wherever it needs to go.


If you need any help feel free to email me and I will do whatever I can. 

You can also dd pages to your blog from the Pages section of your dashboard.Please Keep in mind that if your blog is custom designed your page will more than likely show up when you add new ones! You will need to contact your blog designer to have help adding the element you need to show the page!

Now wasn't that easy?!?

11.30.2011

Automatically E-mail Your Posts

Do you have someone who doesn't have a blogger account but you want them to be able to follow you easily? Here is how you will set that up!
First you will start by going to the settings on your blog. If you don't know how to do so please refer to this post and follow the very first portion of that post. 


add emails wm

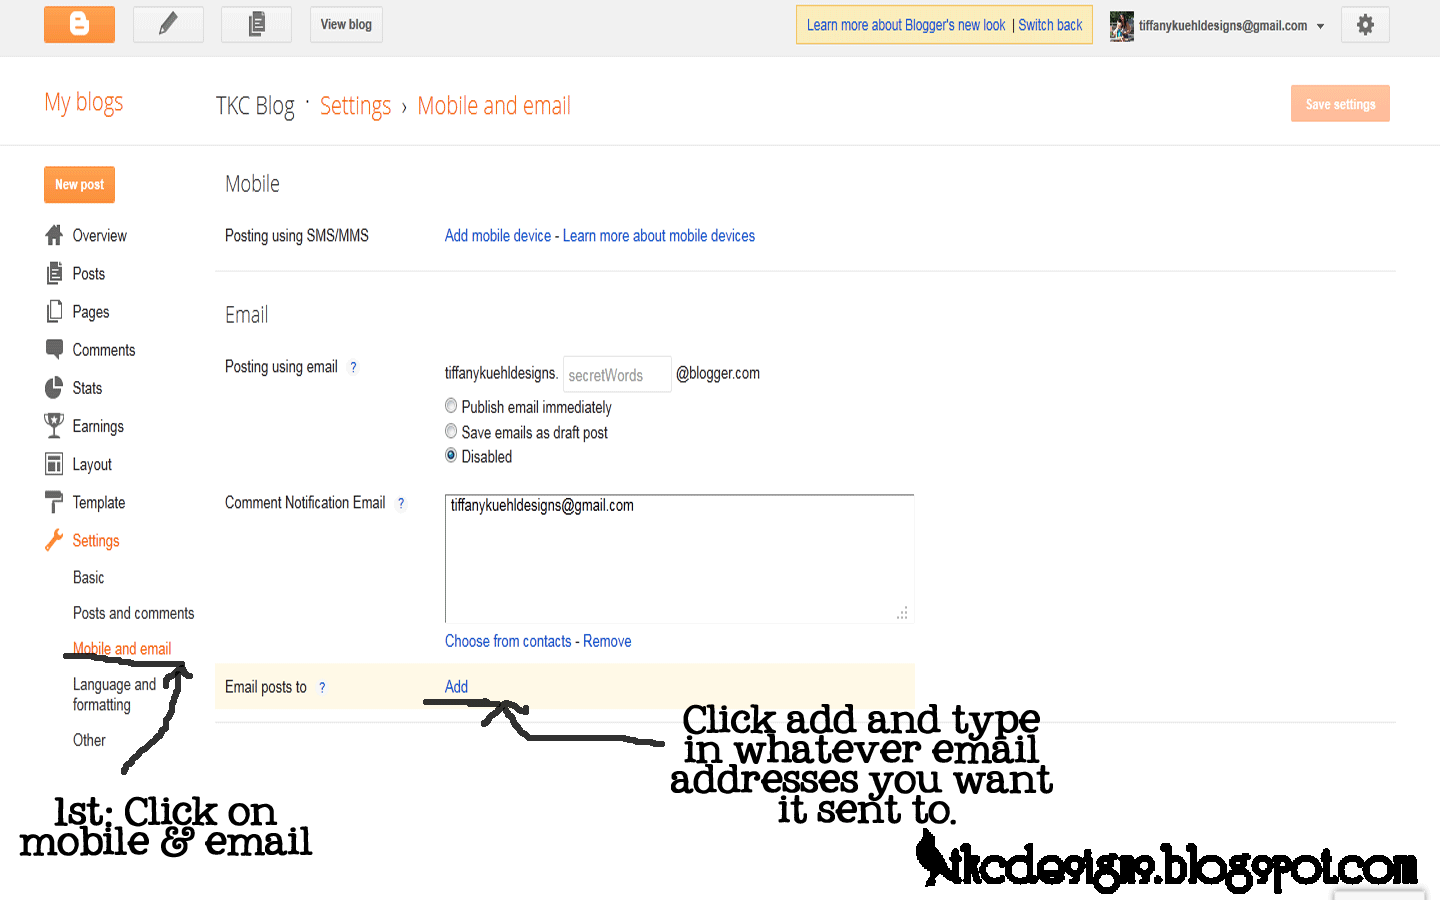
Now you will look on the side and find the line that says mobile & email.  and then lok for the spot that says add and just type in the addresses you want to add. Then make sure you click the save option on the upper right corner!


This is an awesome thing to do if you have grandparent's who aren't computer savvy but have an e-mail address!

Edit A Post

For whatever reason you may find yourself wanting to go back and edit a post that oyu have already published. Here is how you do it...

posts wm

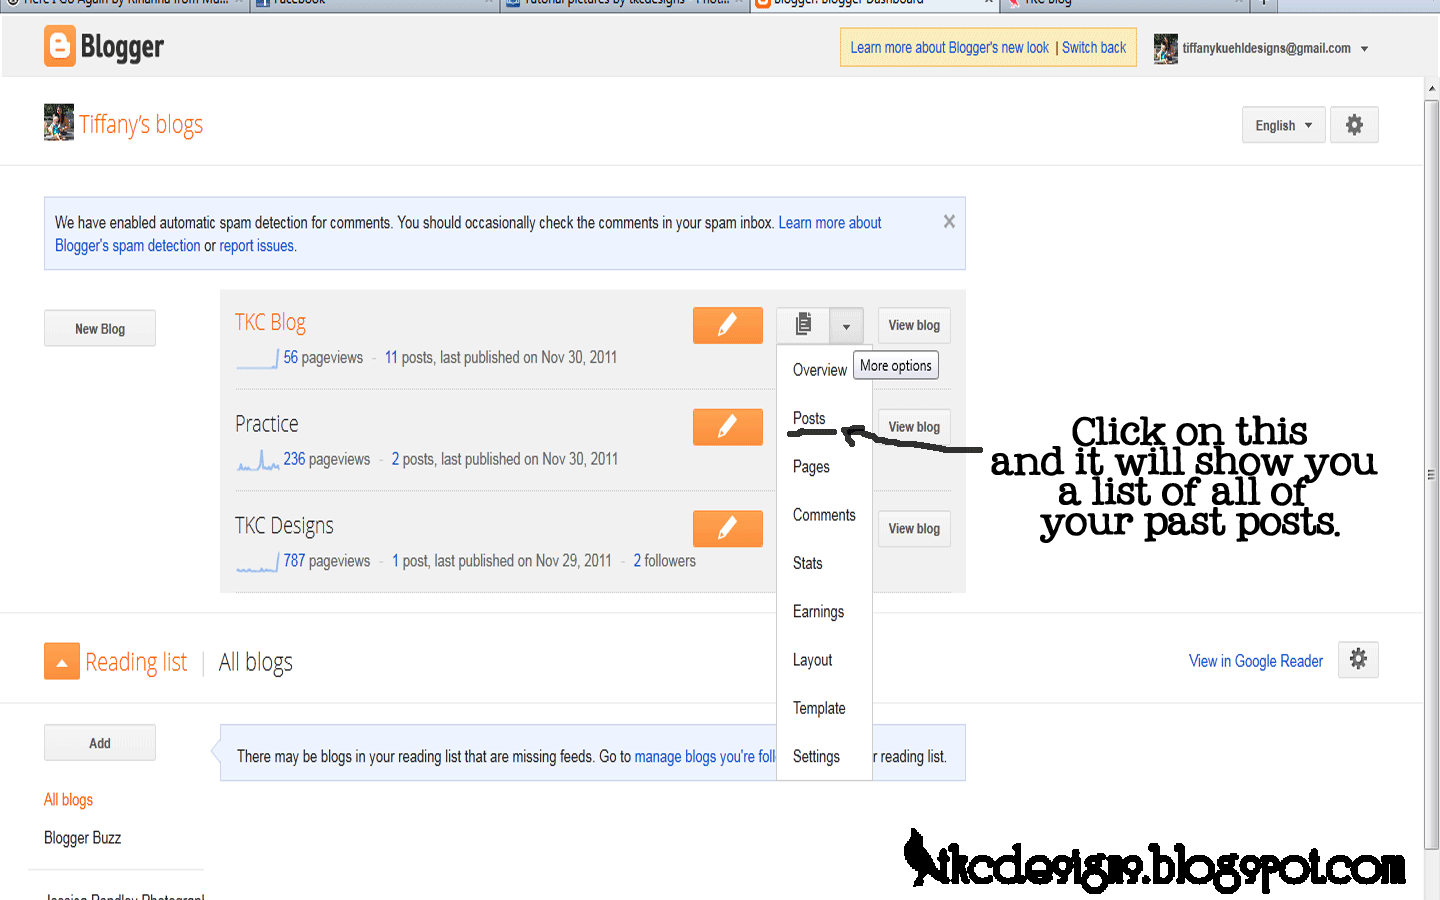
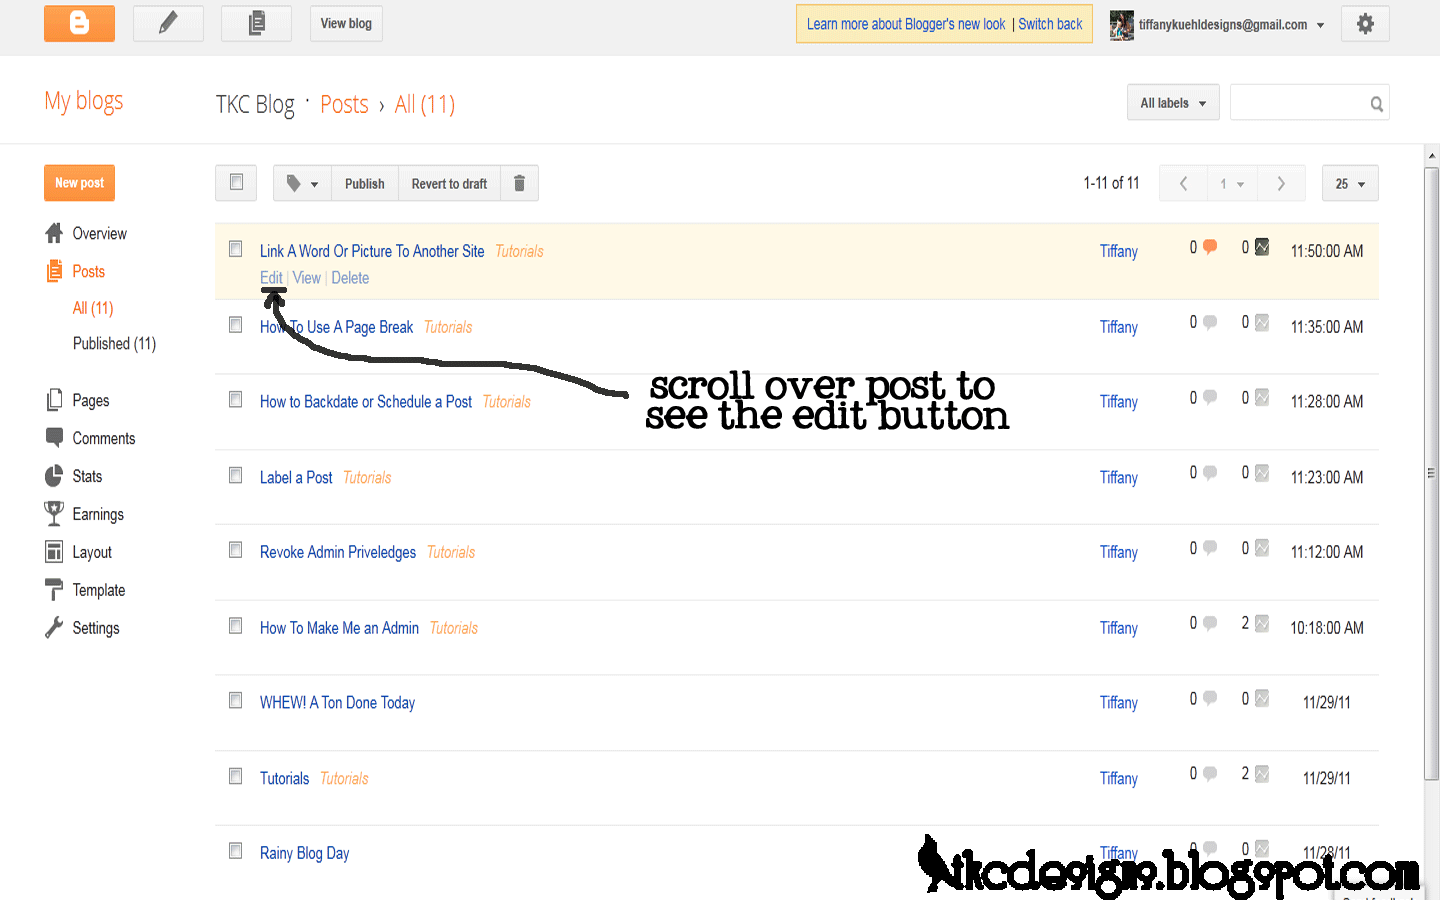
You will start by logging into your blogger account and on the dashboard you will see the little icon that looks like two pieces of paper. Click on that and a menu will appear. You will click on the word posts and it will take you to a page that shows you every post you have ever done!


edit post wm

Next you will find the post that you want to edit. When you put your mouse on that post a little edit button will appear. You will simply click on that and make whatever changes you make Then got o the top of the post region and click update .


I hope that this tutorial was useful. However, to prevent from having to go back and edit very often I always preview my posts before I publish them.

Link A Word Or Picture To Another Site

Do you want to link a word or picture to another site? If you do and you just aren't sure how to do it this is the tutorial for you!


link wm
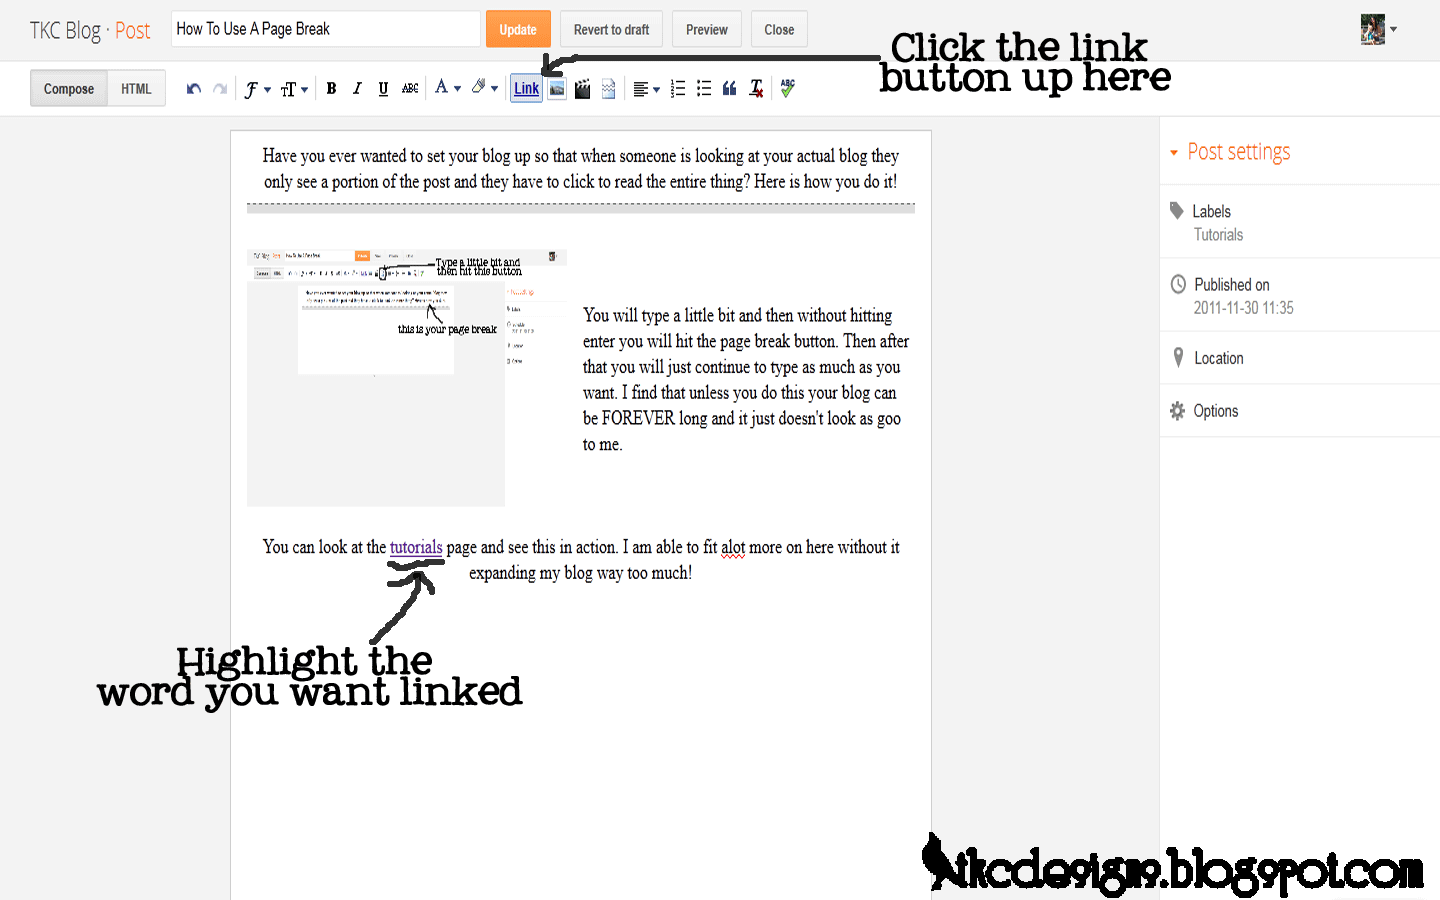
You will start by typing your post up. It's easier if you go ahead and get everything ready and then just do the linking last. Now you will highlight whatever you want to link. Once you have it highlighted just click the link button on the top of your post section. Then just add in the address to the website you want it linked to. Always test the link and click the open in new window option. For example. Check out my personal blog!


Now you see how it works!
This blogging thing is getting easier and easier isn't it?

Backdate or Schedule a Post

Sometimes it is really hard to get on the computer and update your blogs. Or maybe you have time and want to go ahead and write a few but don't want them to all show up at once...

All you have to do it backdate or schedule a post! It's easy to do


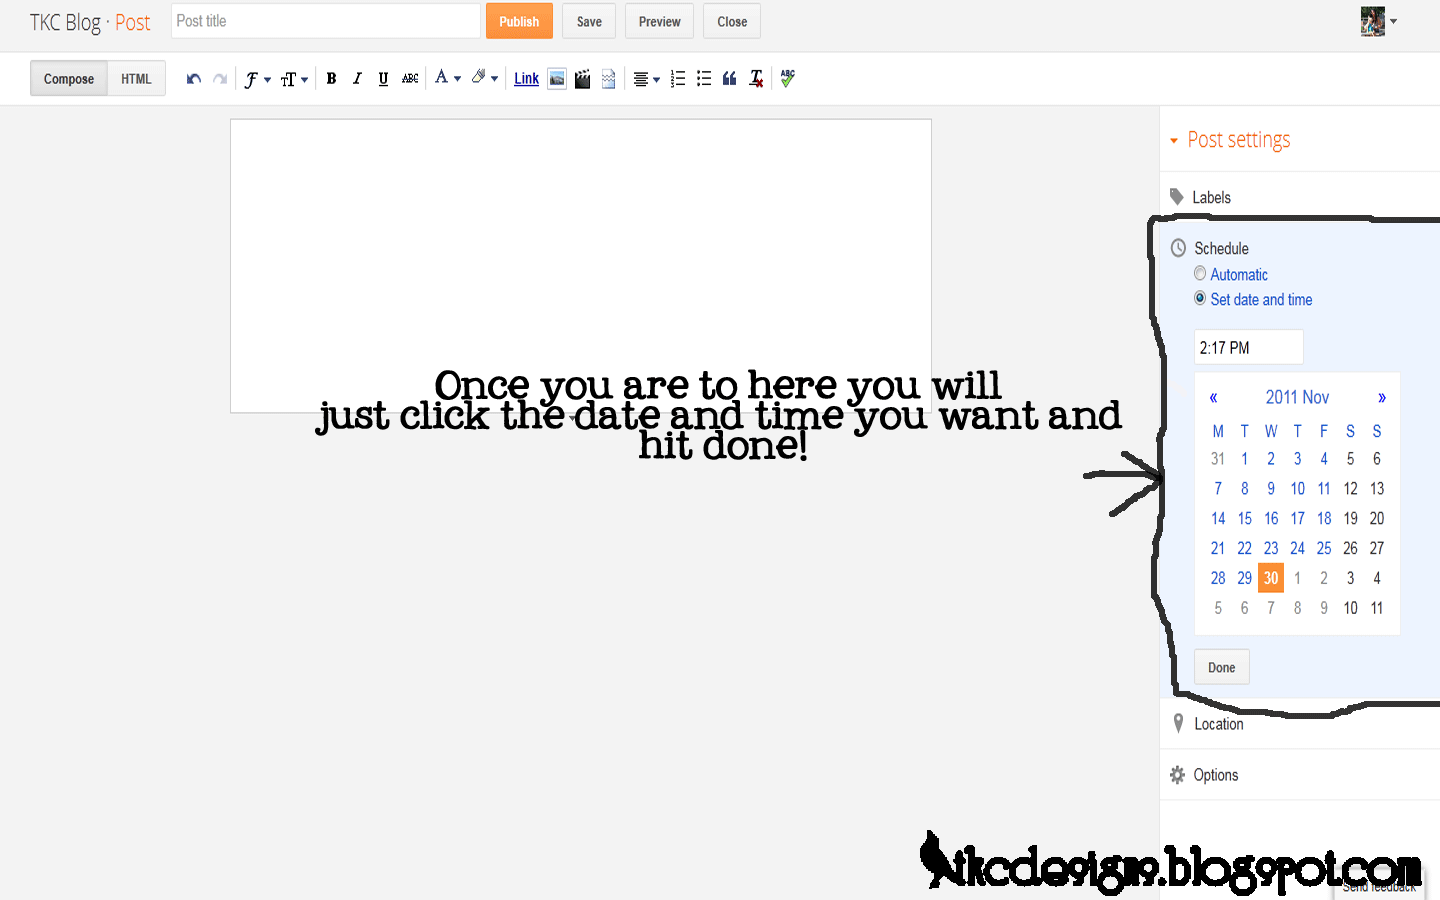
schedule wmYou will go in and get your post just how you want it. Then before you publish it you will go over to where it says schedule. Once you click on that you will click set date and time. It will give you a little calendar and an area to put the time in. You can go backwards or forwards on these. Once you have it set to publish when you want it published you just click done and then publish your post.


This is one of the most used tutorials that I use as a blogger. I hope this was helpful to you!

Label a Post

Do you want to be able to put a label onto a post so that it automatically goes into a certain category?
Well here is how you do it!

labels wm
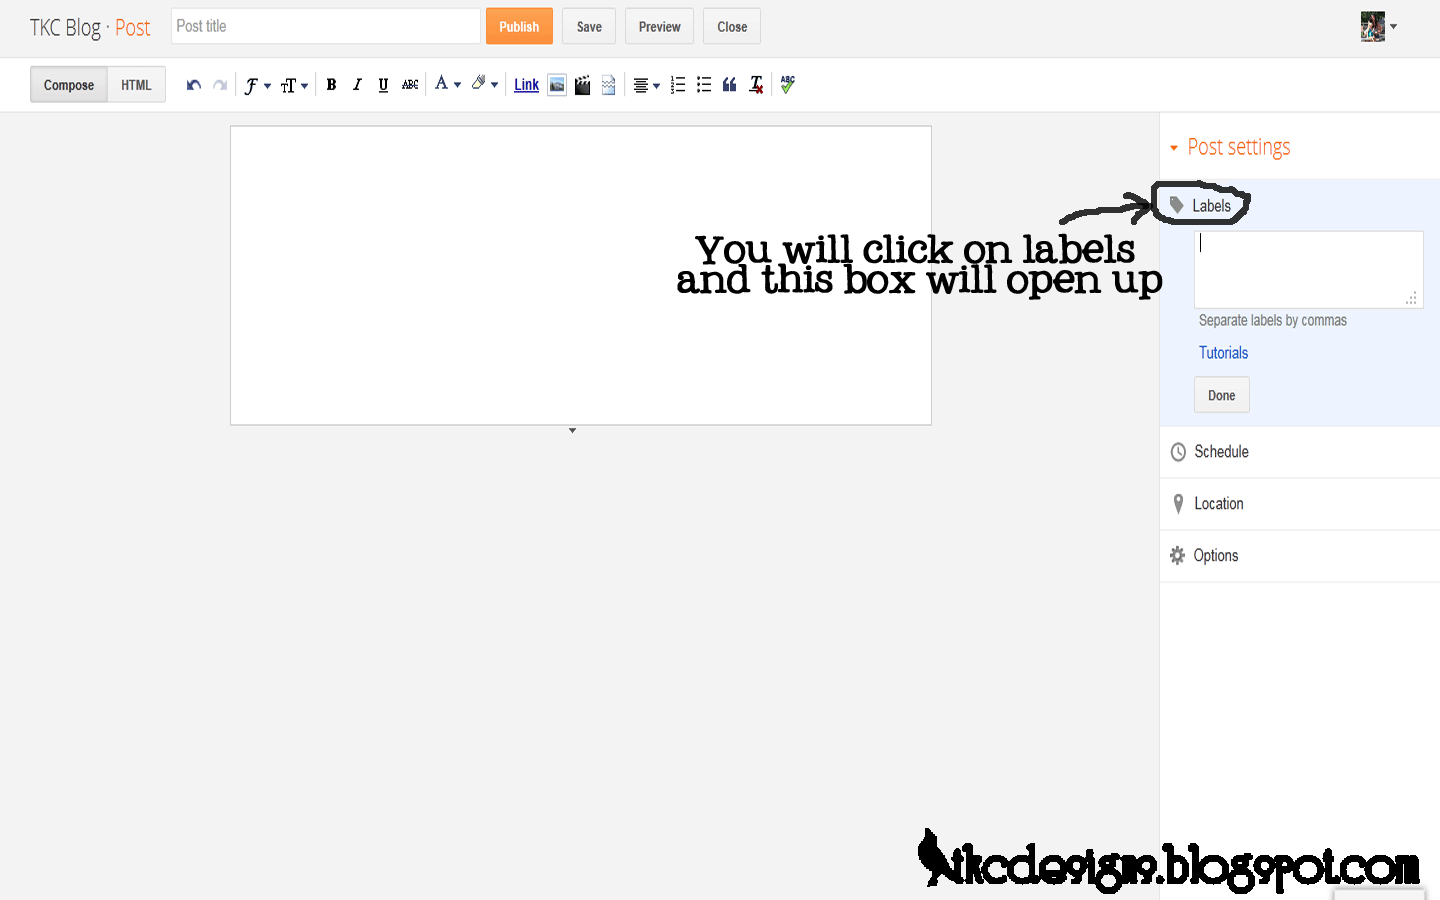
You will start by going in to create a new post. Once you have your post exactly how you want it you will go over to the side of the page and look for where it says label. Just simply type the label you want to give it into that spot. Once the label exists it will be right under that box for you to just click on. Now just click done!


See now that wasn't so hard. I use this feature on all of my blogs!

Revoke Admin Priveledges


Now  that your blog is designed you want to revoke admin priveledges?

This tutorial is an easy one!
 
revoke admin wm


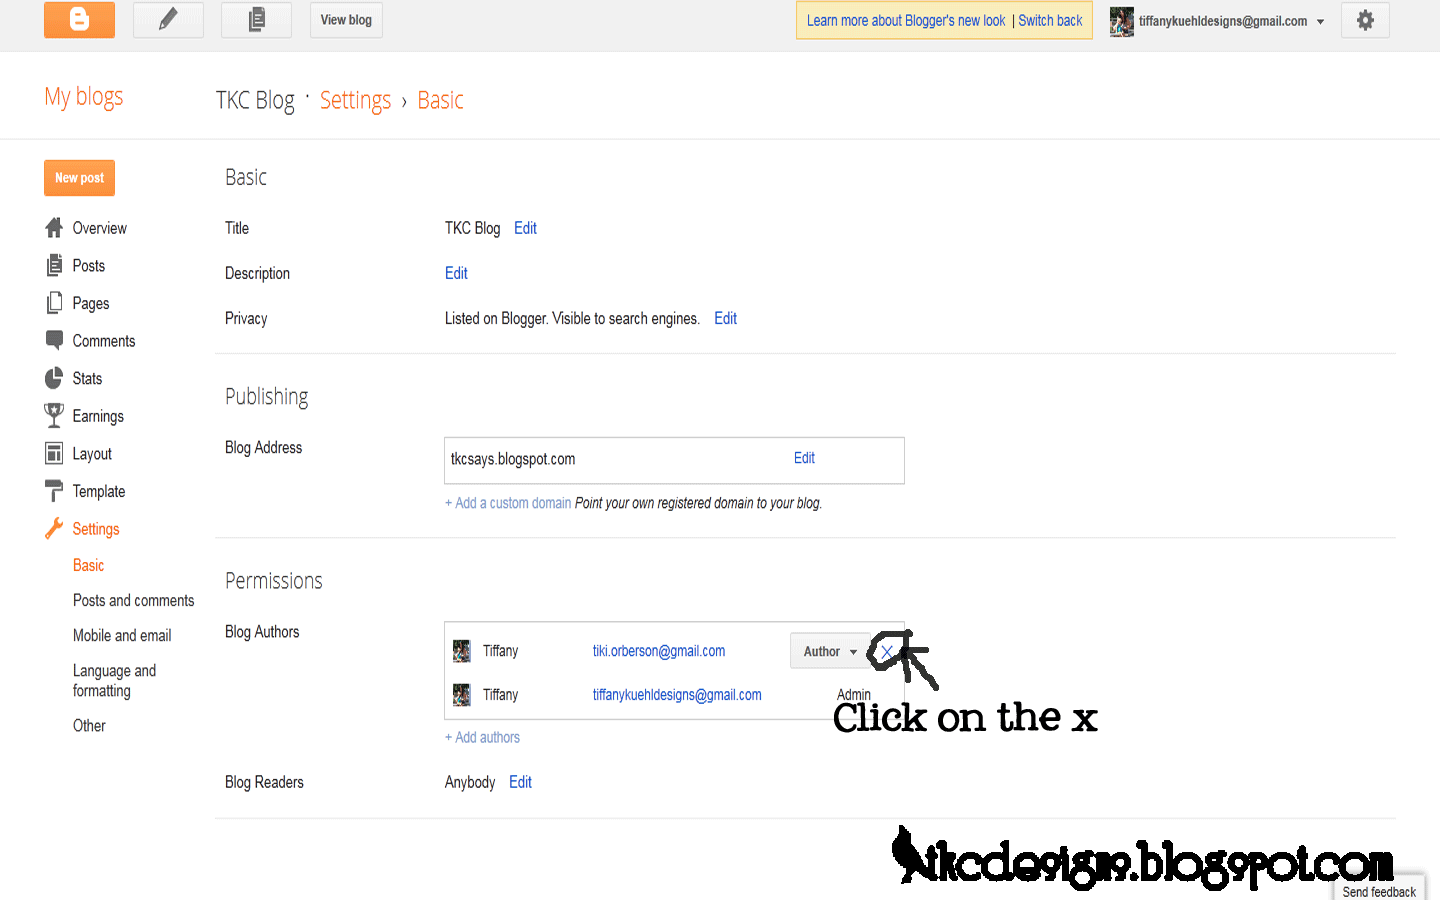
You will go into your settings. Look for the authors like you did to make me an admin. You will sinply click on the ex by my email address and you are done.


See I told you this one would be easy!

How To Make Me an Admin


 When I start to design your blog I need to be able to access your blog. There is a way to do that without giving me all of your personal info.

Settings wm


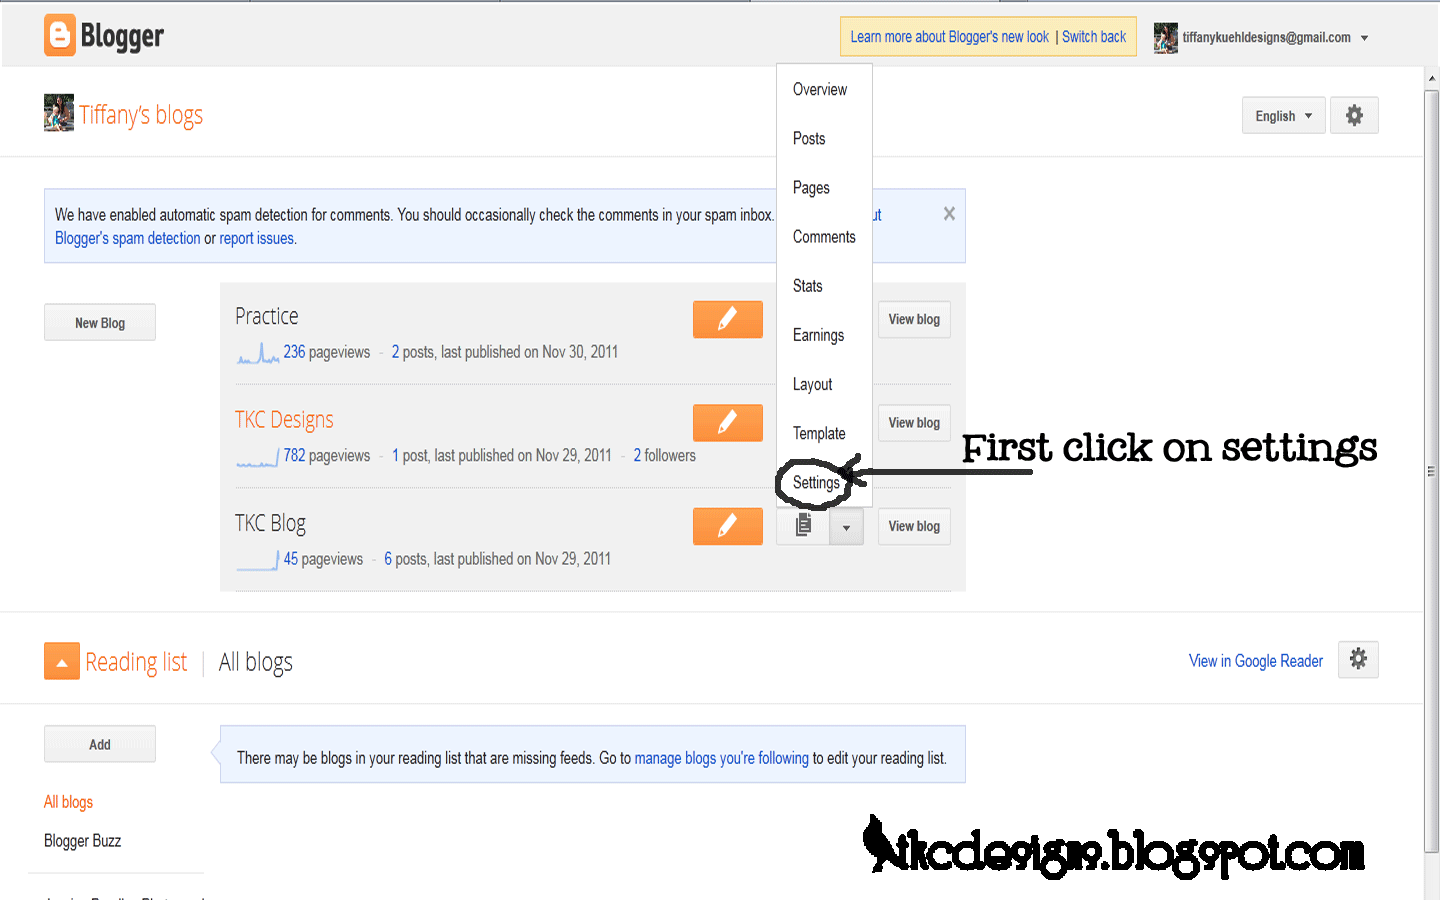
When you sign in you will start by going to your settings.


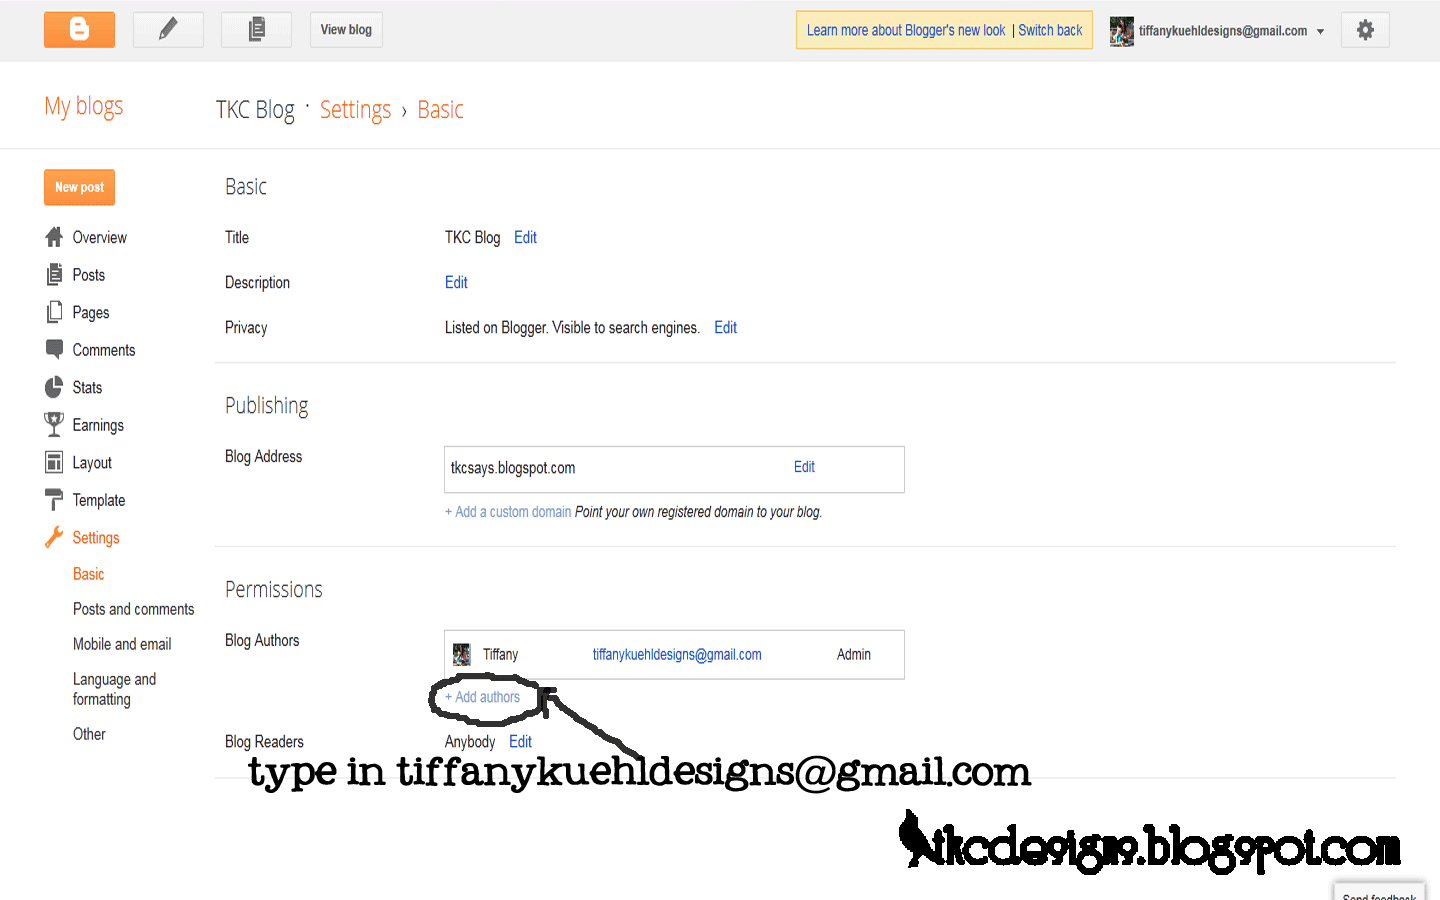
add author wmFrom there you will see an 
add authors option. you will click on that and add tiffanykuehldesigns@gmail.com. Then I will receive an email asking me to become an author. Once I reply to that email you will have to go in and make me an admin.


admin wm


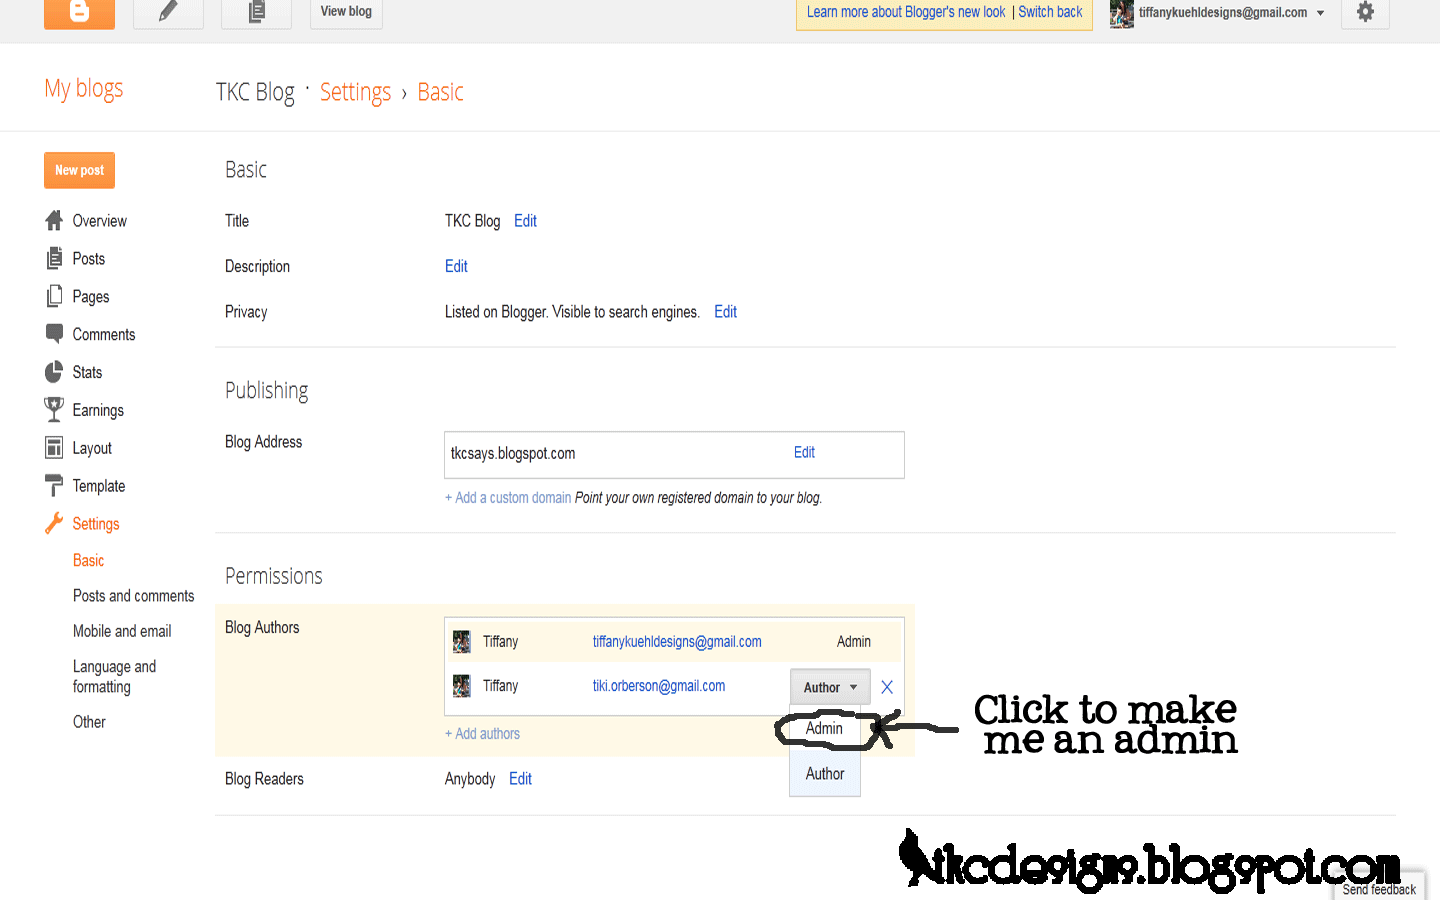
Now you will click to make me an admin. From here I can do anything that I need to do to your blog without ever finding out any of your personal info.


 Now That wasn't to hard was it? 
If you have any questions feel free to comment or email me at tiffanykuehldesigns@gmail.com .